How To Draw A Rose - Step-by-Step Guide For Beginners
Learning how to draw a rose can seem tricky at first glance, but it’s totally doable with the right approach. Whether you're aiming for a simple sketch or a more intricate design, roses are a timeless subject that can bring beauty to any art project. This guide breaks down the process into manageable steps, so even if you're just starting out, you'll be creating stunning rose drawings in no time. So grab your pencil and paper, and let's get started!
Hadley and I recently decided to take on the challenge of learning how to draw a rose, and we found it to be an amazing activity. Not only is it great for Valentine's Day or Mother's Day, but it’s also a fantastic way to express creativity. With just a few supplies and some easy-to-follow instructions, anyone can learn to create their own rose masterpiece.
Now, before we jump into the nitty-gritty, it’s worth mentioning that drawing roses doesn’t have to be intimidating. You’ll see that by breaking it down into smaller parts, it becomes a lot easier. So, whether you're a beginner or just looking for a fun activity, this guide is here to help you every step of the way.
Table of Contents
- Biography
- How to Start Drawing?
- What Art Supplies Do You Need?
- How to Draw a Rose Step by Step?
- How Can You Add Shading to Your Rose?
- What Are Common Mistakes to Avoid?
- Tips for Beginners Learning How to Draw a Rose
- Final Thoughts
Biography
Hadley and I are two passionate art enthusiasts who love exploring new ways to express ourselves through drawing. Here's a little more about us:
| Name | Hadley |
|---|---|
| Age | 27 |
| Hobbies | Sketching, Painting, Photography |
| Favorite Subject | Roses and Landscapes |
How to Start Drawing?
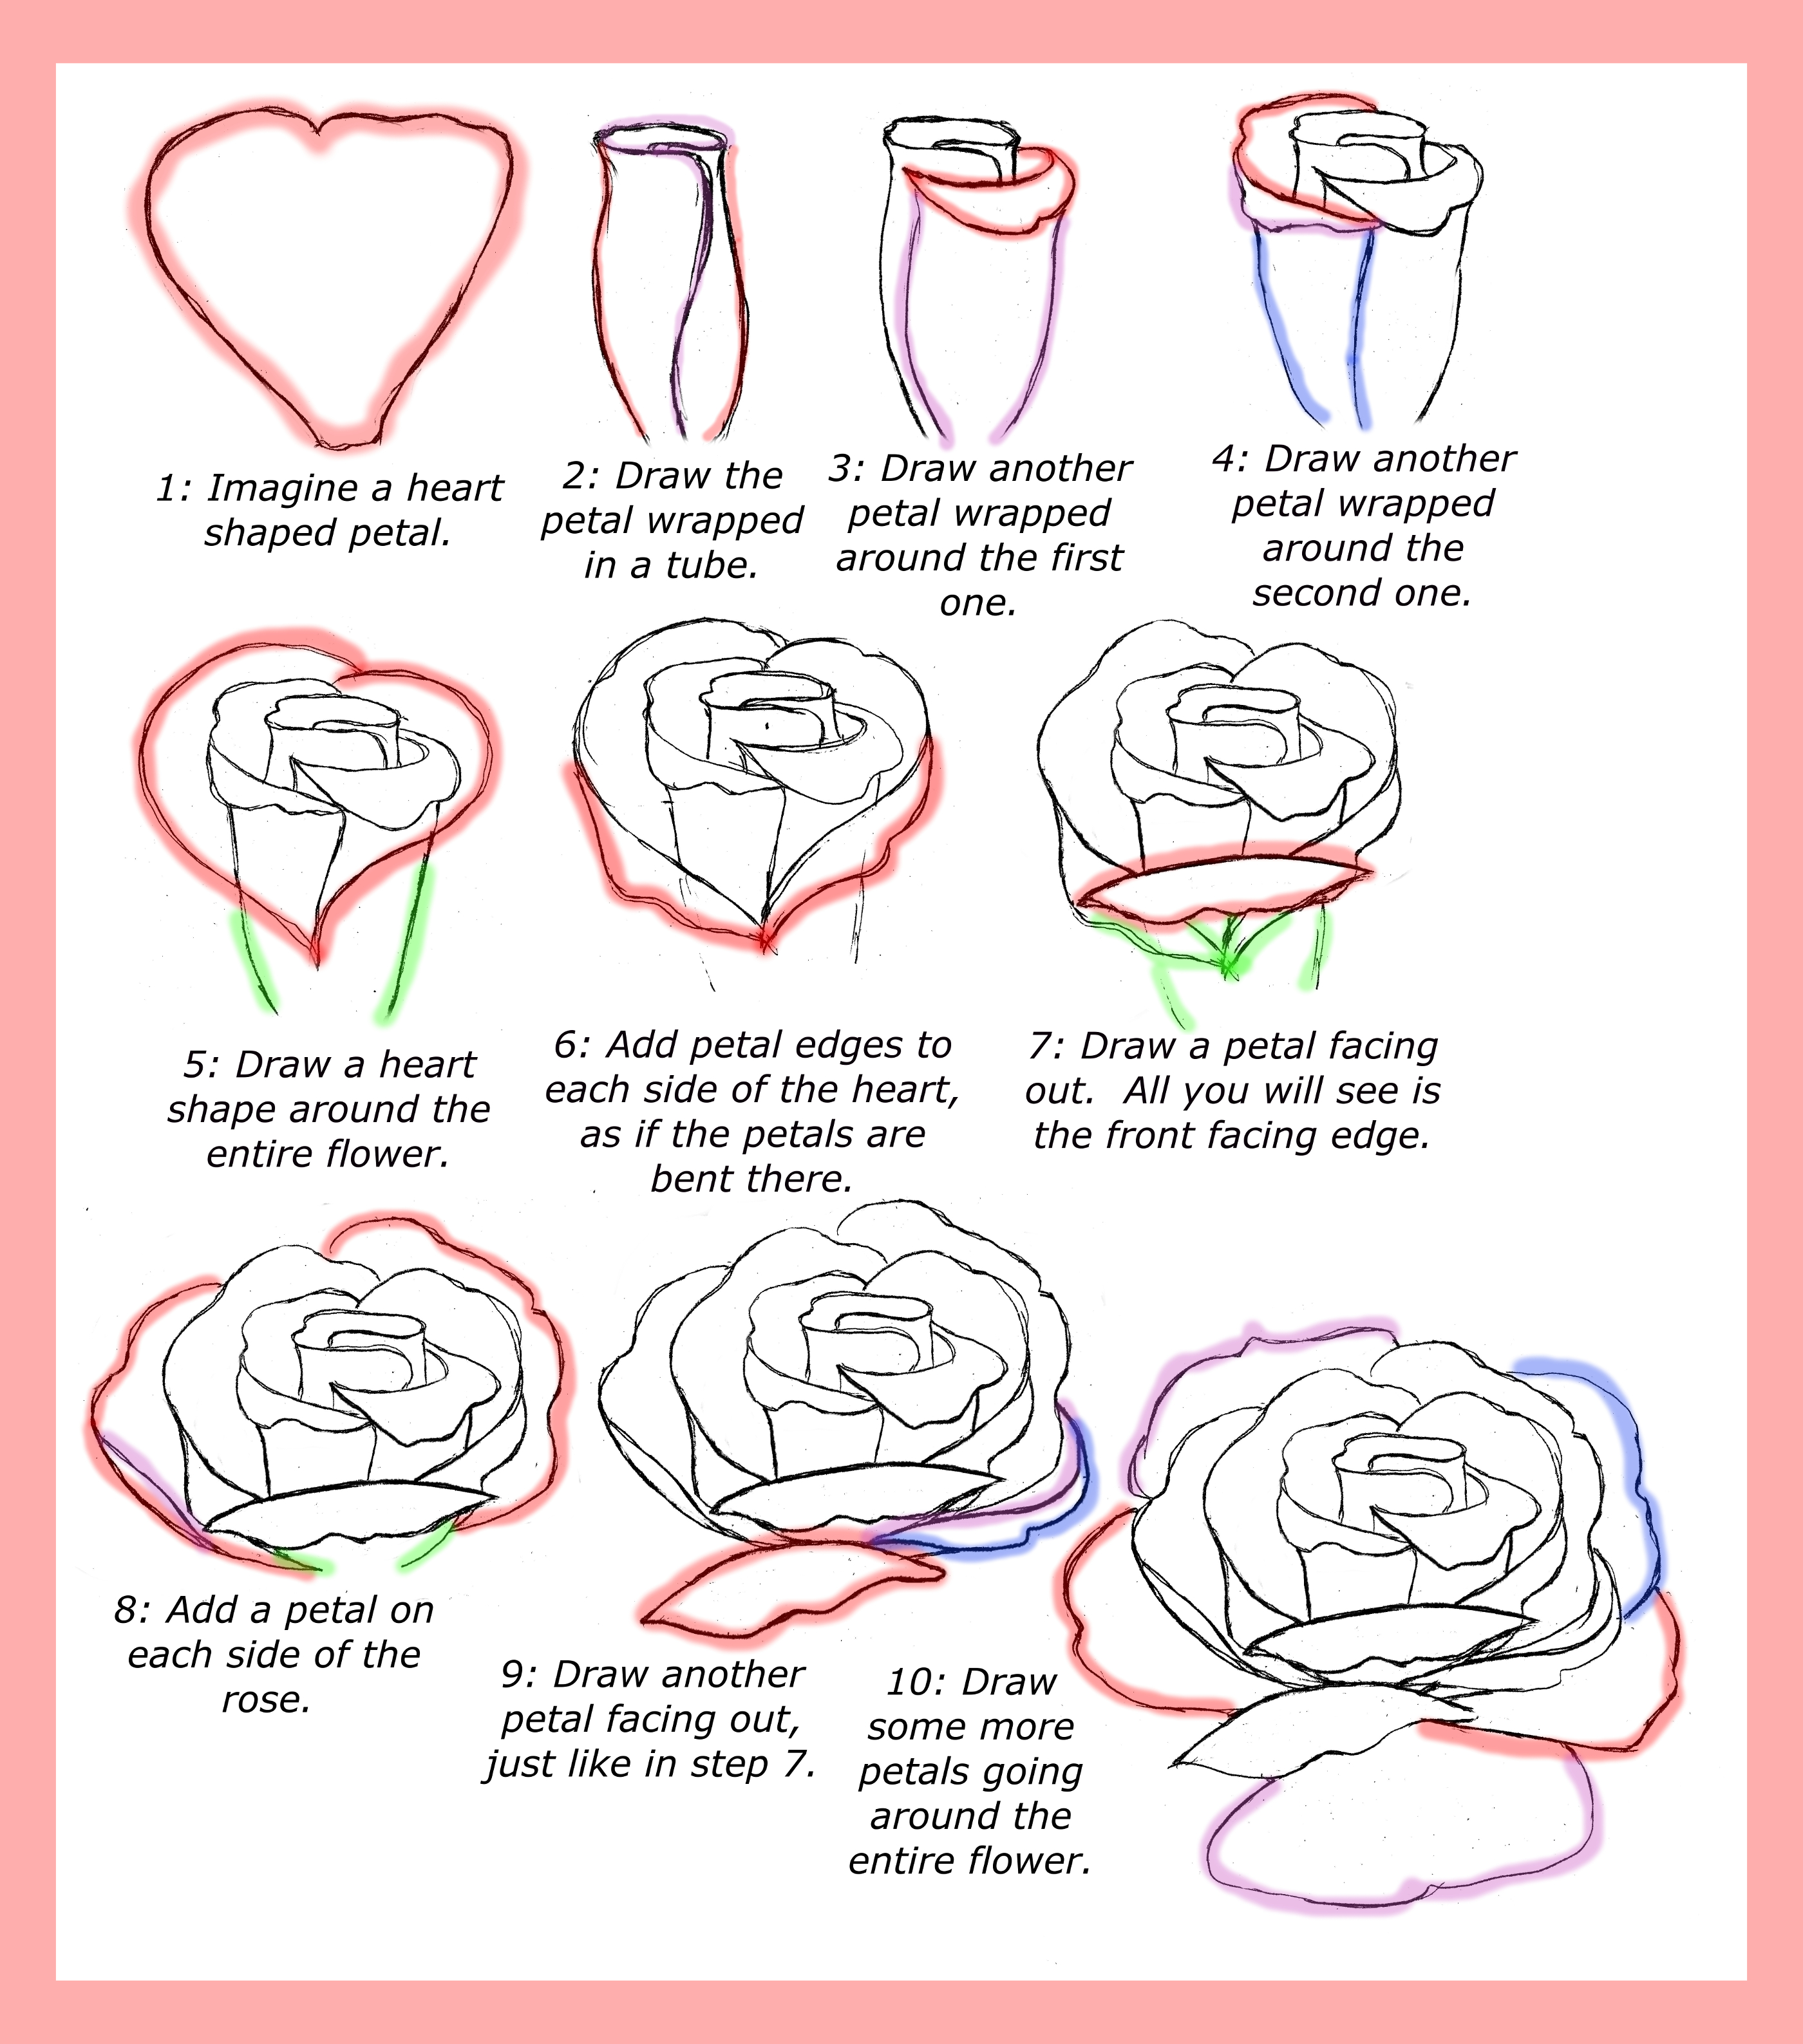
Alright, let's talk about where to begin. Drawing a rose might seem a bit overwhelming at first, but the key is to take it one step at a time. So, how exactly do you get started? First, you’ll want to gather your art supplies. Then, it’s all about creating that initial sketch. Start with a small oval, which will act as the center of your rose. This is kind of like setting the foundation for the rest of the drawing. Keep your strokes light, because you’ll be refining this later.
After you’ve got your oval in place, draw a U shape underneath it. This should look a little like a cup, and it helps form the base of your rose. Next, make some uneven, jagged crescent shapes around the oval. These will eventually become the petals. The beauty of this step is that it doesn’t have to be perfect. In fact, a bit of imperfection makes the rose look more natural. So don’t stress too much about making everything symmetrical.
What Art Supplies Do You Need?
Before you dive into the drawing process, you’ll need a few basic supplies. Here’s a quick list of what you should gather:
- Pencils (HB, 2B, 4B)
- Eraser
- Sketchbook or drawing paper
- Blending tool (optional)
Of course, you can always add more items to your toolkit as you get more comfortable, but these are the essentials. And honestly, if you’re just starting out, you don’t need anything fancy. A simple pencil and paper will work just fine.
How to Draw a Rose Step by Step?
So, now that you’ve got your supplies ready, let’s walk through the steps to draw a rose. First, start with that small oval we talked about earlier. This will be the heart of your rose. Next, add the U shape underneath it. Once you’ve got those two shapes down, it’s time to add the petals. Draw a few jagged crescent shapes around the oval. These don’t have to be perfect—just let them flow naturally.
After you’ve sketched out the basic shape of your rose, you can start refining it. Go over your initial lines and make adjustments where needed. This is the part where you really start to see your rose take shape. Once you’re happy with the outline, you can move on to adding details. This is where the fun really begins!
How Can You Add Shading to Your Rose?
Shading is what gives your rose that three-dimensional look. It’s actually pretty simple once you get the hang of it. Start by identifying where the light source is coming from. This will help you figure out where to add darker tones. Use a softer pencil, like a 4B, to create those shadowy areas. Then, blend everything together with your finger or a blending tool for a smoother look.
One tip is to vary the pressure of your pencil as you shade. This creates different tones and adds depth to your drawing. Don’t be afraid to experiment a bit. Sometimes, just a little extra shading can make a huge difference in how realistic your rose looks.
What Are Common Mistakes to Avoid?
Alright, let’s talk about some common pitfalls when learning how to draw a rose. One of the biggest mistakes is trying to make everything too perfect. Roses are naturally a little messy, so embrace that. Another thing to watch out for is pressing too hard with your pencil. This can make it harder to erase mistakes later on. Always start light and build up from there.
Also, don’t rush the process. It’s tempting to want to finish quickly, but taking your time will pay off in the end. Patience is key, and sometimes the best drawings are the ones that take a little longer to complete. So, just relax and enjoy the process.
Tips for Beginners Learning How to Draw a Rose
For anyone just starting out, here are a few tips to keep in mind. First, practice makes perfect. The more you draw, the better you’ll get. Second, don’t be too hard on yourself. Everyone starts somewhere, and even the best artists had to learn the basics at one point. Third, use references. There’s nothing wrong with looking at pictures of roses while you draw. It can actually be really helpful to see how the petals overlap and how the shadows fall.
Finally, have fun! Drawing is supposed to be enjoyable, so don’t forget to enjoy the process. Even if your first few attempts don’t turn out exactly how you hoped, that’s okay. Each drawing is a step in the right direction.
Final Thoughts
Learning how to draw a rose can be an incredibly rewarding experience. By following these simple steps, you can create beautiful rose sketches that you’ll be proud of. Remember, the key is to take it one step at a time and not get discouraged if things don’t turn out perfectly right away. With a little practice and patience, you’ll be drawing stunning roses in no time. So, grab your pencils and give it a try—you’ve got this!
How To Draw Roses - Happy Family Art
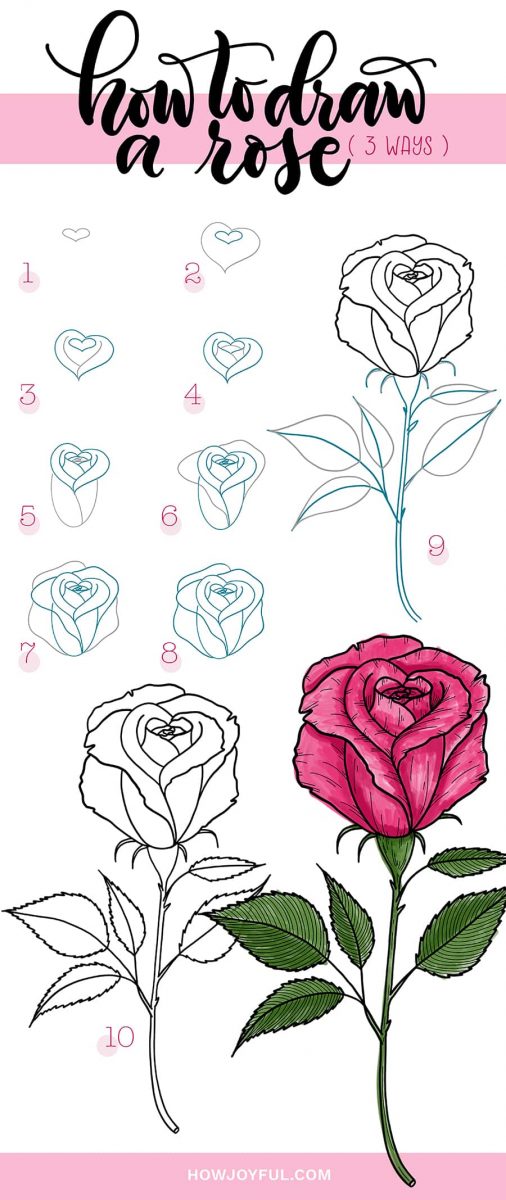
Drawings of roses: How to draw a rose - Step by step tutorial (3 ways)
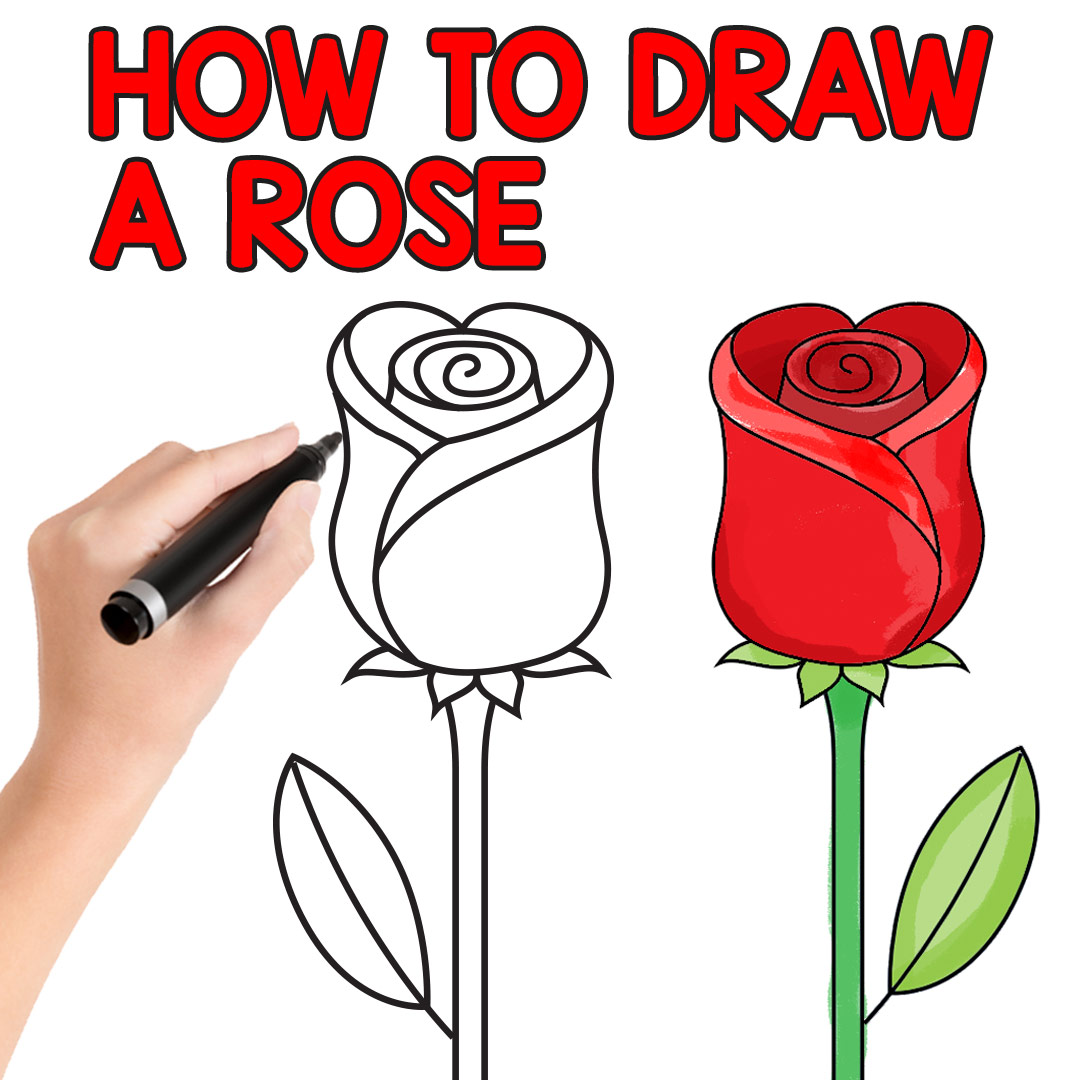
How to Draw a Rose - Easy Step by Step For Beginners and Kids - Easy
