How To Tie A Tie - A Simple Guide For Every Occasion
Figuring out how to tie a tie can feel overwhelming, but it’s a skill that’s surprisingly easy to learn once you break it down into steps. Whether you're preparing for a job interview, a formal event, or just want to look sharp at work, tying a tie properly adds an extra layer of confidence to your appearance. This guide dives into the basics, offering tips and tricks to help you master this timeless skill.
Nowadays, ties aren’t as common as they used to be, but knowing how to tie one is still incredibly useful. From weddings to business meetings, there are plenty of situations where you might need to whip out a tie and impress others with your knot-tying abilities. Don’t worry—this isn’t rocket science. With a bit of practice, you’ll be tying ties like a pro in no time.
Before we jump into the nitty-gritty details, let’s address something important: there’s no single "right" way to tie a tie. Different knots work better for different occasions, shirts, and personal styles. So, instead of getting stuck on perfection, focus on finding what works best for you. Ready? Let’s get started!
Table of Contents
- How to Tie a Tie - The Basics
- What Tie Knot Should I Use?
- How Do I Choose the Right Tie Fabric?
- How to Tie a Tie - Step-by-Step for Common Knots
- Why Does My Tie Look Off?
- How to Adjust Your Tie for a Perfect Fit
- Advanced Tips for Tying a Tie
- Wrapping Up - What Did We Learn?
How to Tie a Tie - The Basics
Alright, let’s start with the foundation. Tying a tie isn’t as tricky as it looks, and it all begins with understanding the basic setup. First, button up your shirt and flip the collar upward. This creates a clean canvas for your tie. Hang the tie around your neck, making sure the wide end hangs slightly lower than the narrow end. Sometimes, people overlook this simple step, but it makes a huge difference.
Now, here’s a little tip: the wide end should hang about a hand’s length below the narrow end. This gives you enough fabric to work with when creating your knot. Of course, if you’re taller or have a longer neck, you might need a longer tie to achieve the right proportions. In some respects, it’s kind of like tailoring your outfit to fit perfectly.
What Tie Knot Should I Use?
Let’s talk about knots. There’s no shortage of options when it comes to tying a tie, but some are more popular than others. For instance, the Windsor knot is often considered the go-to for formal events because of its bold, symmetrical shape. On the flip side, the Four-in-Hand knot tends to be a bit more casual and is perfect for everyday wear.
For example, if you’re attending a wedding, you might lean toward a Windsor knot for its polished look. But if you’re heading to the office, a Four-in-Hand knot could be just the ticket. It’s all about matching the knot to the occasion. In short, your choice of knot depends on the vibe you’re aiming for.
How Do I Choose the Right Tie Fabric?
Tie materials matter, too. Silk ties are a classic choice because they’re smooth, shiny, and versatile. They tend to work well for both formal and semi-formal events. On the other hand, wool or cotton ties can add texture and depth to your outfit, making them ideal for casual settings.
Patterns also play a role. Striped ties are timeless and easy to pair with almost anything, while polka dots or subtle patterns can inject a bit of personality into your look. Just a little reminder: bold patterns should be balanced with simpler elements in your outfit to avoid overwhelming the eye.
How to Tie a Tie - Step-by-Step for Common Knots
Now that you’ve got the basics down, let’s walk through the steps for a couple of popular knots. We’ll start with the Four-in-Hand, which is one of the easiest and most versatile knots out there.
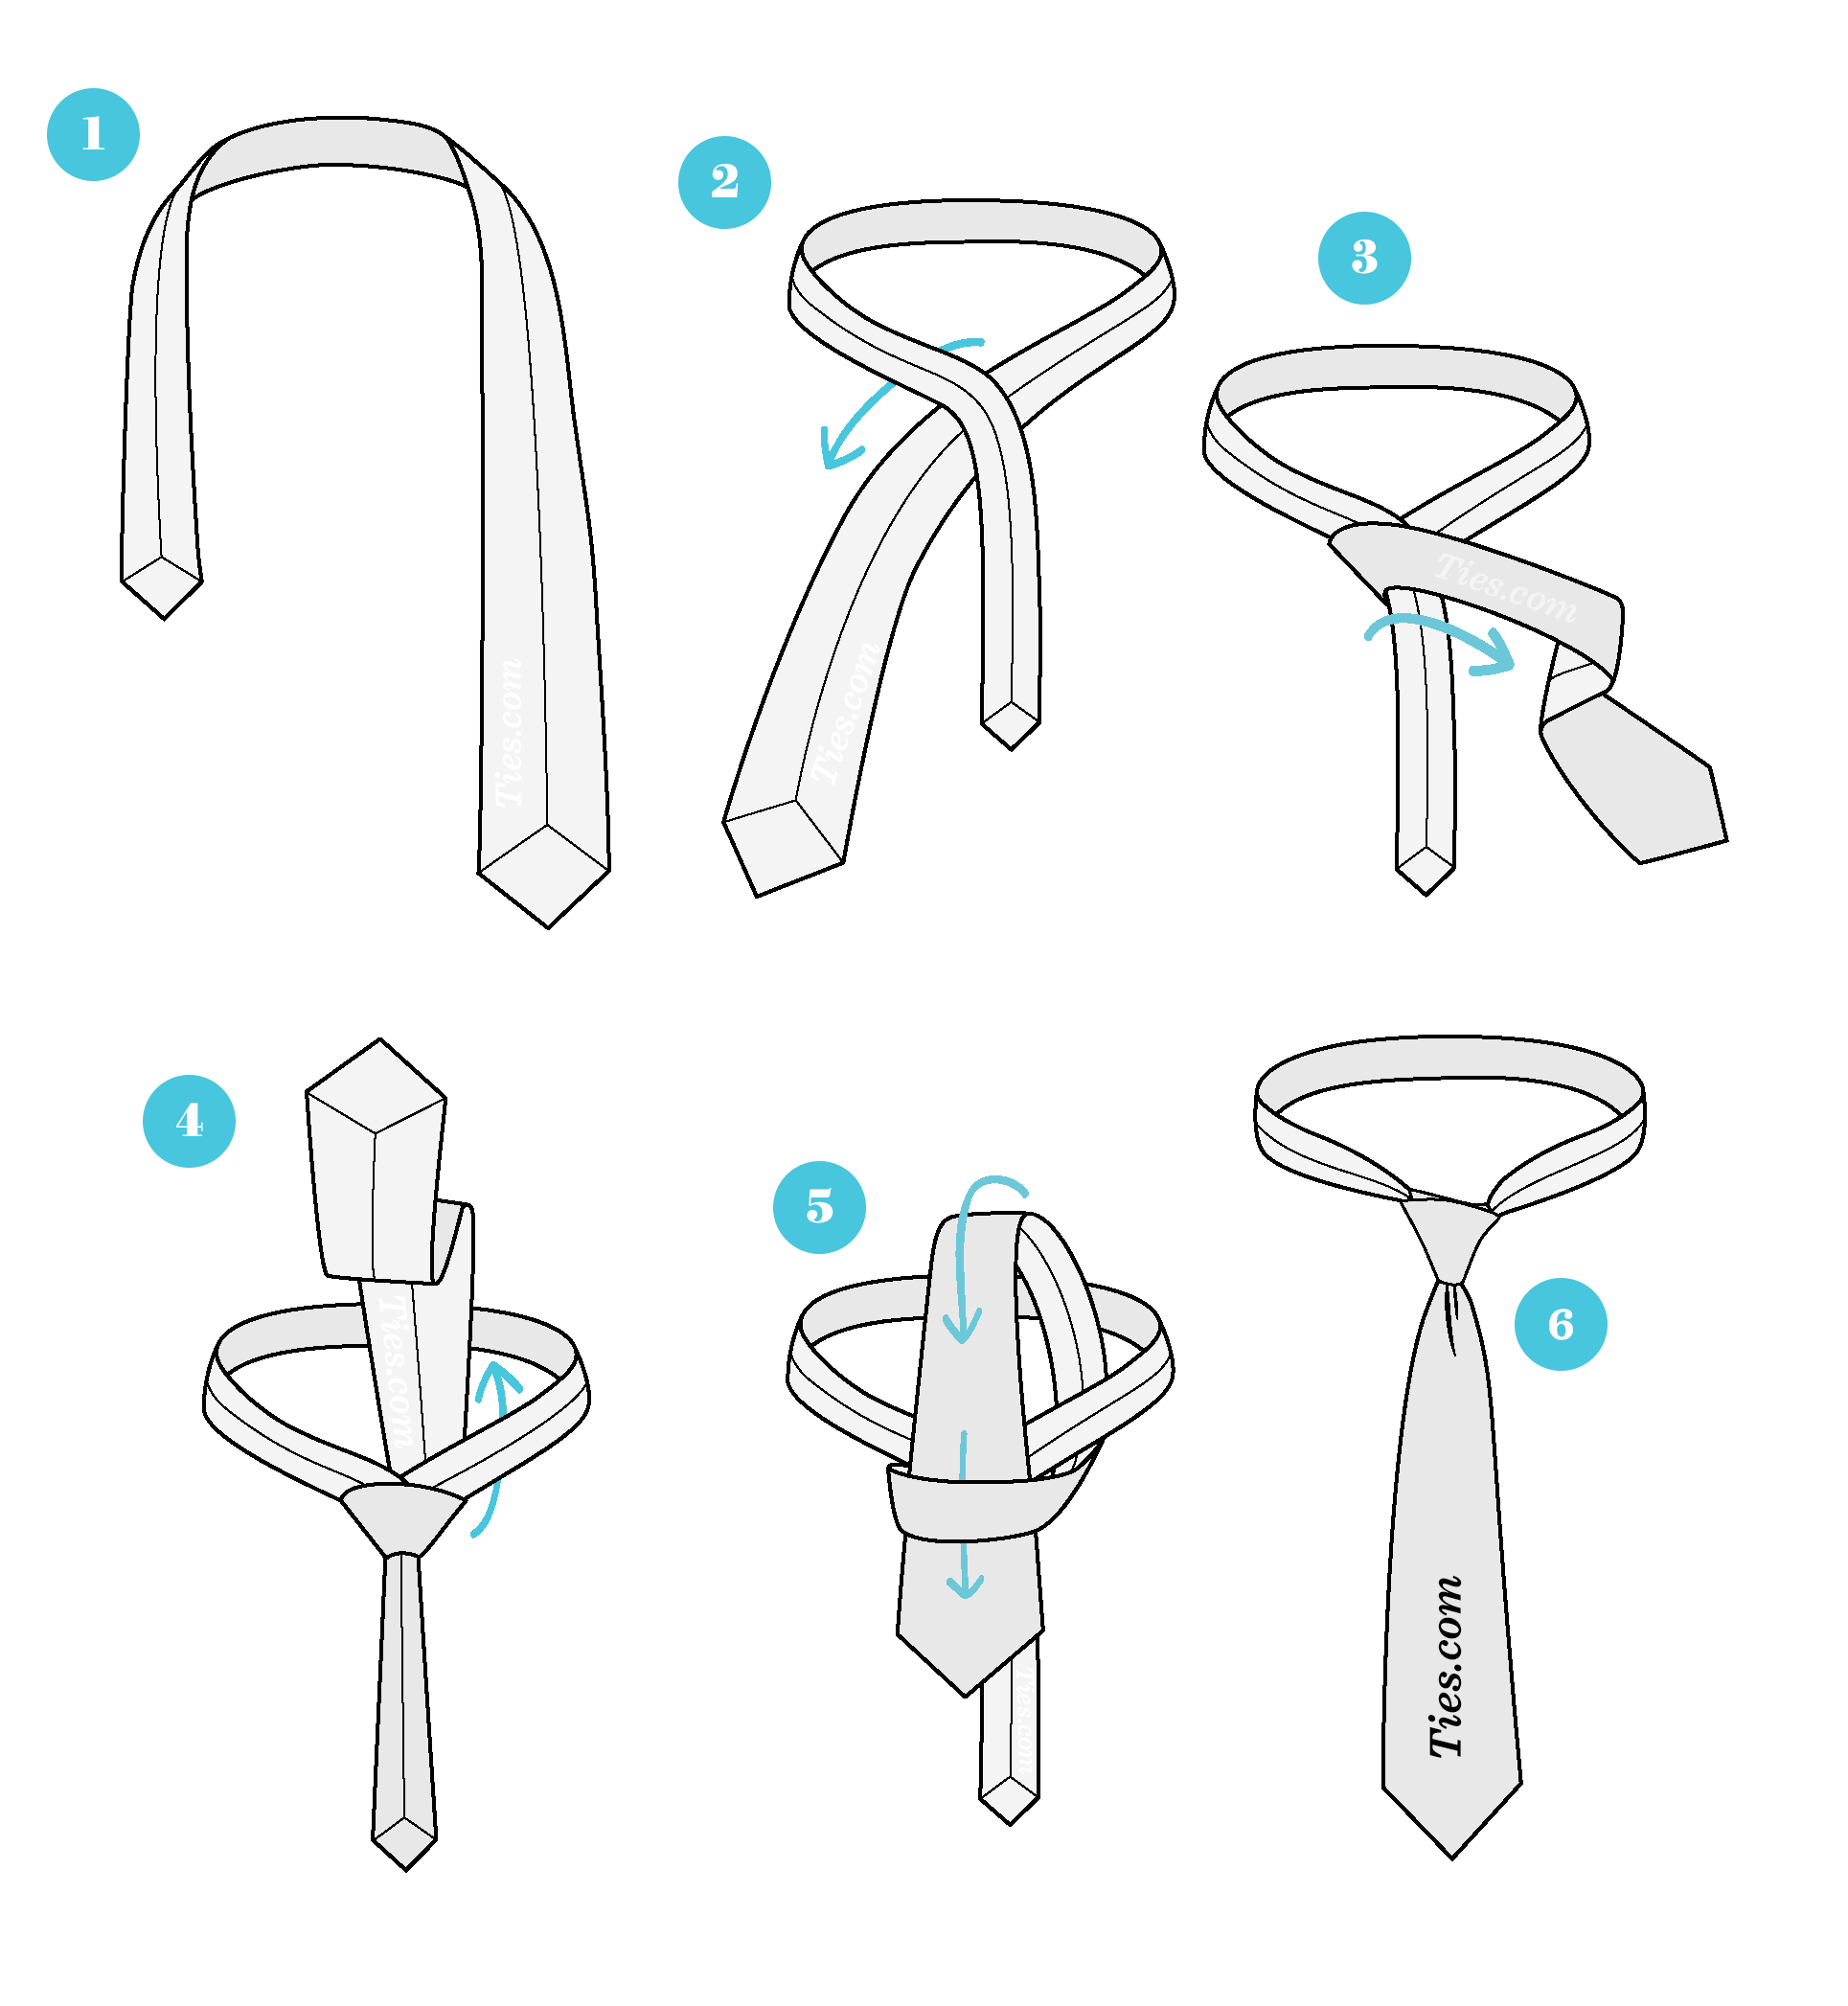
The Four-in-Hand Knot
Here’s how it goes:
- Place the tie around your neck, with the wide end hanging lower than the narrow end.
- Cross the wide end over the narrow end, then bring it behind and pull it through the front.
- Wrap the wide end across the front again, forming a loop.
- Bring the wide end up through the loop, then pull it down through the knot.
- Adjust the knot by gently tugging on the narrow end and smoothing out any wrinkles.
See? That wasn’t so hard, was it? The Four-in-Hand knot is perfect for beginners because it’s straightforward and looks great on most shirt collars.
The Windsor Knot
Next up is the Windsor knot, which is a bit more involved but well worth the effort. Here’s how you tie it:
- Start with the tie around your neck, wide end hanging lower.
- Cross the wide end over the narrow end, then bring it behind and pull it through the front.
- Wrap the wide end around the front again, forming a larger loop.
- Bring the wide end up through the loop, then pull it down through the knot.
- Finally, tuck the wide end through the knot at the front and adjust until it’s snug and symmetrical.
Like I mentioned earlier, the Windsor knot is great for formal occasions because of its bold appearance. It’s a little more time-consuming, but it’s worth the extra effort for that sharp look.
Why Does My Tie Look Off?
Even if you follow the steps perfectly, sometimes your tie just doesn’t look quite right. There could be a few reasons for this. First, make sure the knot is centered and symmetrical. If it’s off to one side, it’ll throw off the whole look. Additionally, check the length of the tie. Ideally, the tip should hit right at your belt buckle or waistband.
In some cases, the fabric itself might be causing issues. Silk ties tend to hold their shape better than thinner materials, so if your tie keeps slipping or bunching up, it might be worth trying a different one. Anyway, these little adjustments can make a big difference in how polished your tie looks.
How to Adjust Your Tie for a Perfect Fit
Once you’ve tied your knot, it’s time to fine-tune the fit. Start by pulling gently on the narrow end to tighten the knot around your collar. Then, adjust the length of the tie so it falls just above your belt buckle. If you notice any wrinkles or creases, smooth them out with your fingers.
One neat trick is to create a dimple in the tie just below the knot. Simply pinch the fabric with your fingers and pull it slightly downward. This adds a touch of elegance and helps the tie sit neatly against your chest. It’s just a little detail, but it goes a long way in elevating your overall look.
Advanced Tips for Tying a Tie
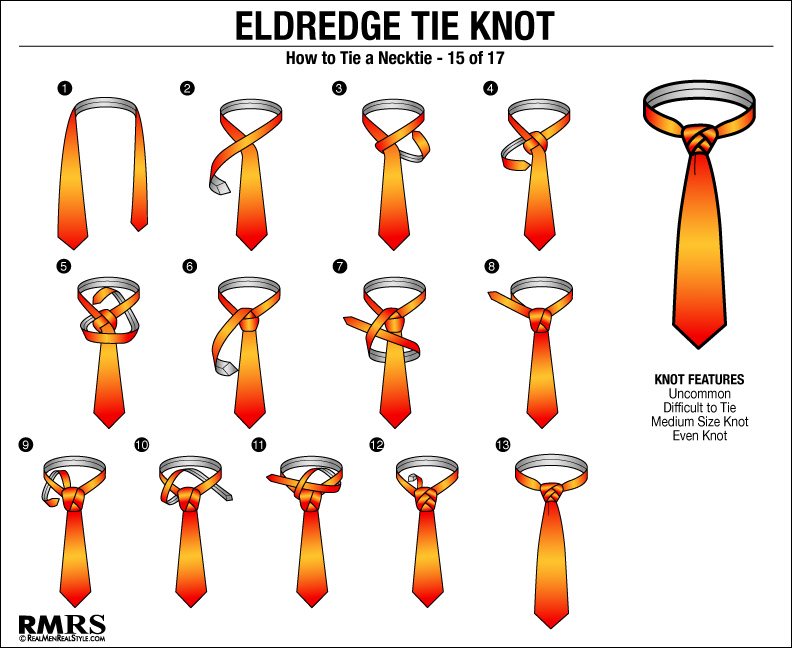
Once you’ve mastered the basics, you might want to experiment with more advanced knots. The Eldredge and Trinity knots, for instance, are intricate designs that add a unique flair to your outfit. These knots tend to be more complex, so they’re best saved for special occasions or when you really want to make a statement.
For example, the Eldredge knot features a series of loops and twists that create a visually striking pattern. It’s definitely not for everyday wear, but it’s perfect for events where you want to stand out. Similarly, the Trinity knot offers a modern twist on the classic tie, with a slightly asymmetrical shape that’s both stylish and unexpected.
How to Tie a Tie - Final Thoughts
Learning how to tie a tie is more than just a practical skill—it’s a way to express yourself and enhance your personal style. Whether you prefer the simplicity of a Four-in-Hand knot or the sophistication of a Windsor knot, there’s a tie and knot combination that suits every occasion.
So, go ahead and give it a shot. Practice in front of a mirror, try out different knots, and don’t be afraid to experiment with colors and patterns. Before you know it, tying a tie will feel like second nature. And who knows? You might even find yourself enjoying the process.
Wrapping Up - What Did We Learn?
We covered a lot of ground today, from the basics of tying a tie to advanced tips for creating unique looks. We learned that the key to tying a great tie lies in choosing the right knot, fabric, and fit for the occasion. We also discovered that practice makes perfect, and with a little effort, anyone can become a tie-tying pro.
Ultimately, tying a tie is about confidence and self-expression. So, the next time you put on a tie, remember that it’s not just about following steps—it’s about making a statement. Now, go out there and rock that look!
How To Tie A Simple Knot (Oriental Knot) | Ties.com
How To Tie A Tie Knot - 18 Different Ways of Tying Necktie Knots

How To Tie a Simple Knot | Tie Knot Tutorial | Learn How to Tie a Tie
