How To Draw Eyes - Simple Techniques And Tips
Learning how to draw eyes doesn’t have to be overwhelming. Eyes are the windows to the soul, and capturing their essence in art can be a rewarding experience. Whether you’re an aspiring artist or a seasoned pro, mastering the art of drawing eyes can bring life to your creations. This guide provides a friendly, step-by-step approach to help you create stunning eyes that convey emotion and depth.
When it comes to drawing eyes, many beginners feel stuck or unsure where to begin. That’s where this article steps in. We’ll explore the basics of eye anatomy, shading techniques, and how different styles affect the final result. You’ll find that the process is simpler than you think, and with a bit of practice, you can create realistic or stylized eyes that truly pop.
So, whether you’re aiming for realistic portraits or anime-inspired characters, this guide will give you the tools you need. Let’s break down the steps and tips to help you on your artistic journey. Grab your pencils and let’s get started, because honestly, drawing eyes is a skill anyone can learn with the right guidance.
How to Draw Eyes - Table of Contents
- How to Draw Eyes - Getting Started
- Why Is Learning Eye Anatomy Important?
- What Are the Common Eye Shapes?
- How to Add Depth and Life to Your Drawings
- How to Draw Eyes - Step-by-Step Guide
- Which Pencils Should You Use for Drawing Eyes?
- Tips for Drawing Realistic Eyes
- How to Draw Eyes - Final Thoughts
How to Draw Eyes - Getting Started
Alright, let’s talk about the basics. Drawing eyes is all about understanding the structure and breaking it down into manageable parts. In a way, it’s like building a puzzle where each piece plays its role. For example, the iris, pupil, and eyelids all work together to create the illusion of a lifelike eye. You don’t need fancy tools or expensive materials to start. All you need are a couple of pencils and some paper. So, don’t worry too much about having the perfect setup just yet.
Now, let’s focus on the shapes. Eyes aren’t perfect circles, and that’s something many beginners overlook. They tend to be slightly oval, with the upper eyelid curving over the lower one. Sometimes, the lower eyelid is barely visible, depending on the angle. Understanding these nuances can make a big difference in how realistic your drawings look. Just a little attention to detail goes a long way.
Why Is Learning Eye Anatomy Important?
Learning eye anatomy is like uncovering the blueprint of how eyes work. It’s not about memorizing every tiny detail but rather grasping the big picture. For instance, the sclera, or the white part of the eye, isn’t always pure white. It can have subtle shadows or even a slight yellowish tint, depending on the person’s age or health. These small details can make your drawings more convincing.
Additionally, the way light interacts with the eye is crucial. The cornea, for example, is slightly raised and acts like a lens, reflecting light in interesting ways. This reflection can add depth and realism to your drawings. So, when you’re shading, think about where the light source is coming from and how it affects the different parts of the eye. It might seem tricky at first, but with practice, it becomes second nature.
What Are the Common Eye Shapes?
Eye shapes vary greatly from person to person, and recognizing these differences can help you create more diverse characters. For instance, almond-shaped eyes are one of the most common types. They’re slightly slanted and give a soft, gentle appearance. On the other hand, hooded eyes have extra skin that covers the eyelid, making them appear more mysterious or calm.
Then there are upturned eyes, which tend to slant upward at the outer corners. These eyes often give a playful or mischievous vibe. Lastly, downturned eyes slant downward, creating a slightly sad or thoughtful expression. By understanding these variations, you can add personality to your drawings and make them more dynamic. It’s all about observing and experimenting with different shapes to see what works best for your style.
How to Add Depth and Life to Your Drawings
Adding depth to your eyes involves more than just shading. It’s about creating layers and dimension. One trick is to use a dark pencil, like a 6B or 8B, to define the pupil and iris. This creates a strong contrast that draws attention to the eye. Then, use a lighter pencil, like an HB, to add subtle details around the eyelids and lashes. This combination of dark and light can make your eyes pop off the page.
Also, don’t forget about reflections. Eyes are reflective surfaces, so adding a small highlight can make them look more lifelike. You could place this highlight on the upper part of the iris or near the pupil, depending on where the light is coming from. It’s a small detail, but it can make a huge difference. Sometimes, it’s the little things that bring a drawing to life, you know?
How to Draw Eyes - Step-by-Step Guide
Alright, let’s get into the nitty-gritty of how to draw eyes step by step. First, sketch a rough outline of the eye shape. Keep it light so you can easily adjust if needed. Then, define the iris and pupil, making sure they’re centered within the eye. After that, add the eyelids and lashes, paying attention to how they curve around the eye. Finally, shade the drawing to give it depth and realism.
Here’s a quick breakdown of the steps:
- Sketch the basic eye shape.
- Draw the iris and pupil.
- Add the eyelids and lashes.
- Shade the drawing for depth.
These steps are simple enough, but each one requires a bit of practice. Don’t rush through them. Take your time and observe how each part contributes to the overall look of the eye. It’s a bit like baking a cake—each ingredient matters, and skipping a step can affect the final result.
Which Pencils Should You Use for Drawing Eyes?
Pencils are your best friends when it comes to drawing eyes. You’ll want a mix of dark and light pencils to create contrast and detail. A 6B or 8B pencil is great for the darker areas, like the pupil and lashes. For lighter details, an HB pencil works perfectly. Sometimes, you might even want to use a 2B or 4B pencil for intermediate shading. It’s all about experimenting and finding what works best for you.
Also, don’t forget about erasers. They’re not just for fixing mistakes. You can use them to lighten areas or create highlights. For example, if you accidentally shade too dark, you can gently erase some of the graphite to bring back some brightness. It’s a handy trick that can save you a lot of frustration.
How to Draw Eyes - Tips for Realistic Eyes
Creating realistic eyes takes practice, but there are a few tips that can help you along the way. First, observe real eyes whenever you can. Look at photos or people around you and study how light affects their eyes. This observation will help you understand how to replicate those effects in your drawings.
Second, pay attention to proportions. The size and placement of the eyes in relation to the rest of the face can make a big difference. For example, eyes that are too far apart or too close together might look off. It’s all about finding the right balance. Finally, don’t be afraid to experiment with different techniques. Sometimes, the best results come from trying something new or unexpected.
How to Draw Eyes - Final Thoughts
Learning how to draw eyes is a journey filled with discovery and growth. It’s not just about following steps or rules—it’s about finding your own style and voice as an artist. Whether you’re drawing realistic eyes or anime-inspired ones, the key is to enjoy the process and keep practicing. Remember, every artist starts somewhere, and with time, you’ll see your skills improve.
So, grab your pencils and paper, and give it a shot. You might surprise yourself with what you can create. And hey, if you get stuck, there’s always more to learn. There are countless tutorials and resources out there to help you along the way. Just keep exploring, and before you know it, you’ll be drawing eyes that truly shine.

Drawing Eye Practice by Wicked-Wonders on DeviantArt
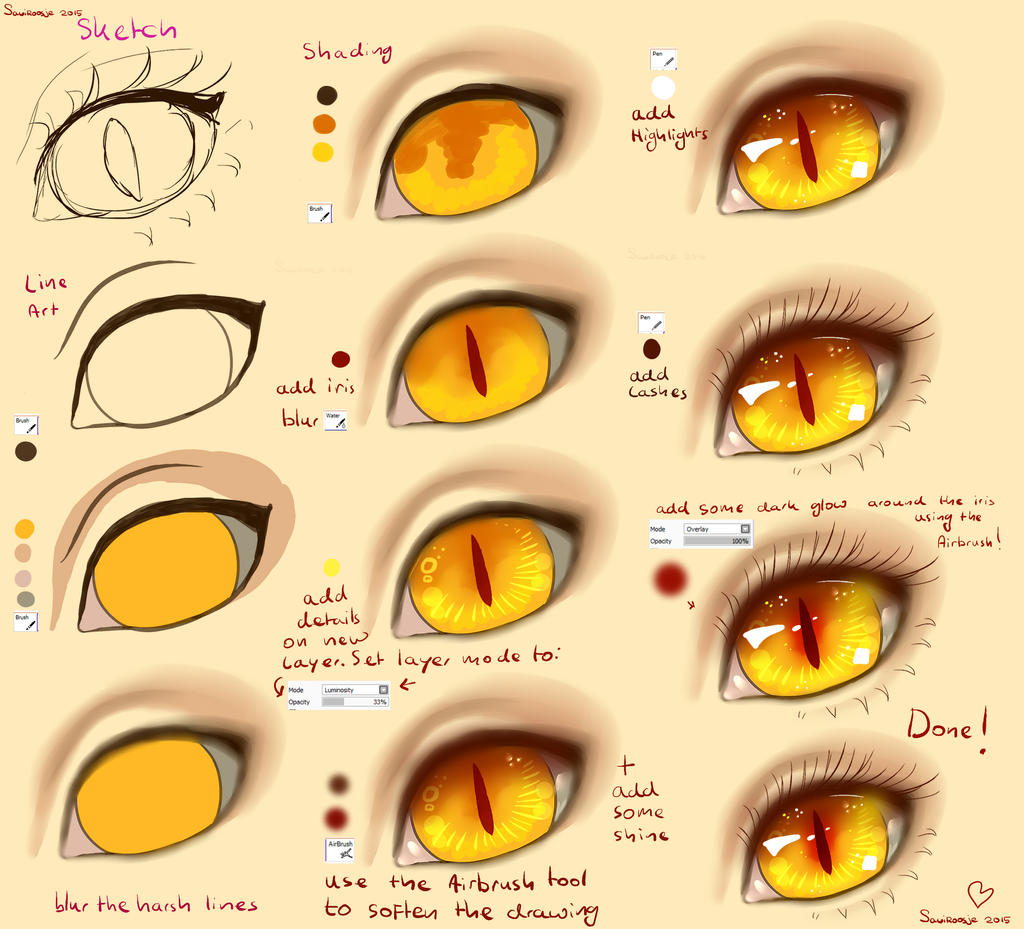
Step by Step - Cat EYE TUTORIAL by Saviroosje on DeviantArt

Realistic eyes practice by tho-be on DeviantArt
